T-Parting Hair Sectioning

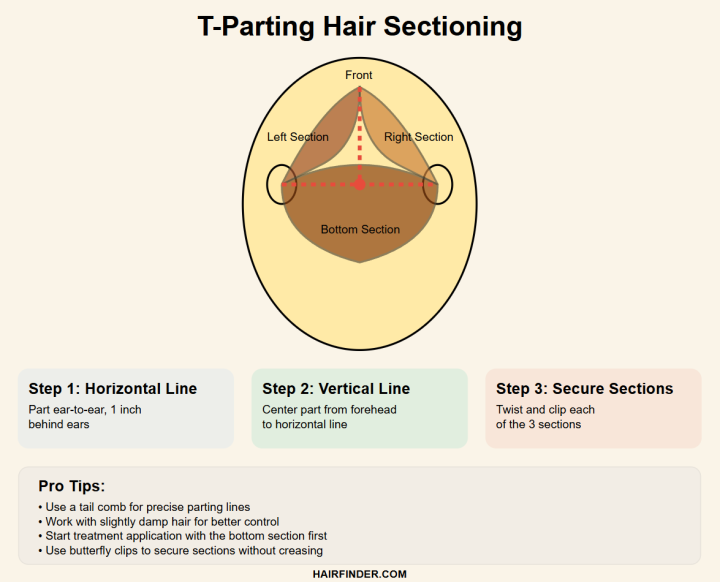
A: The T-parting technique is one of the most fundamental hair sectioning methods used by stylists, and once you understand the concept, it becomes second nature. The name "T-parting" comes from the fact that when you're finished sectioning, the parting lines on your head will literally form the shape of the letter "T" when viewed from above.
Begin by creating the horizontal line of the T, which forms the top of the letter. Using the pointed end of a tail comb, create a straight horizontal part that runs from ear to ear across the back of your head. This line should be positioned approximately one to one and a half inches behind your ears, depending on your head size and hair density. The key is to make this line as straight and even as possible, as it will serve as your foundation.
To ensure you're getting the right placement, tilt your head slightly forward while looking in the mirror. You should be able to see this horizontal line clearly across the back of your scalp. This horizontal section will separate the lower portion of your hair, which includes everything from the nape of your neck up to this dividing line, from the upper sections.
Next, you'll create the vertical line that forms the stem of the T. Starting from the center of your forehead, use your comb to create a straight center part that runs all the way back to where it intersects with your horizontal line. This vertical part should divide the remaining upper portion of your hair into two equal left and right sections.
When you've completed both lines, you should have three distinct sections. The bottom section includes all the hair below your horizontal ear-to-ear line, essentially covering the nape and lower back of your head. The two upper sections are divided by your center part, creating equal left and right portions that extend from your hairline back to where the vertical line meets the horizontal line.

To keep your sections organized and out of the way while you work, twist each section loosely and secure it with a large butterfly clip or hair clamp. Avoid using rubber bands or tight elastics, as these can create unwanted creases in your hair, especially when it's damp and more vulnerable to impression marks.
Professional stylists often recommend starting your treatment application with the bottom section first, as this area typically takes longer to process due to the hair's natural resistance patterns. The hair at the nape tends to be more resistant to chemical processing, so giving it a head start often results in more even overall results.
When applying your product, work systematically through each section, taking small subsections within each major section to ensure thorough, even coverage. This methodical approach prevents you from accidentally missing spots or over-processing areas that have already been treated.
The T-parting method isn't just useful for chemical treatments. Many hairstylists use this same sectioning technique for blow-drying and straightening with flat irons. Once you master this basic sectioning pattern, you'll find it makes many hair care tasks much more manageable and professional-looking.
©Hairfinder.com
See also:
7-section parting
Star sectioning